Okay great! You have finally created a membership site with MemberPress on your WordPress website and are now wondering how to protect or paywall some of your content. Right?
In this post, I will show you how to do just that easily with MemberPress Rules and what they can do for your site to maximize revenue.
Let’s get started!
In This Article
Reasons to protect your Membership site content
Offering premium content on your membership website is a necessity, especially if you want to attain your financial goals.
In today’s internet age, there are several popular online learning platforms such as Payhip, Skillshare, Udemy, Coursera, OptinMonster University, Fiverr Learning and so on that make money from offering paid online courses in several fields.
And you too can follow in their footsteps. Especially, if you have a teaching class or you run a school.
There are times you’d want to give out some exclusive piece of information not to every member of your community. Hence, you’d need to restrict access in exchange for money.
However, before you embark on restricting some of your content on your membership site, you need to ensure you have lured enough customers to your site or have grown a solid customer base with freebies such as free certificates, eBooks, online courses, webinars, masterclasses, etc.
I strongly advise that this lead magnet procedure or strategy should even be a continuous one, as it’ll continue to grow your membership site database and generate more revenue for you over time.
Content types you can protect on your Membership site using MemberPress
There are several methods of producing or generating content. They include articles, infographics, videos, music, eBooks, or other related downloadable products.
If you also offer online courses or coaching programs with MemberPress, you can protect these contents on your membership site by assigning content protection rules with MemberPress.
Let’s see some content rules you can activate from the MemberPress section on your WordPress dashboard.
Types of Content Rules in MemberPress
Rules are a feature of MemberPress plugin that allows you to restrict access to all or any of your membership site content.
For instance, you can allow access to a particular page or some exclusive articles only when a visitor subscribes to a top-tier plan on your membership site. There are many rules you can use to restrict access depending on what type of content you want to protect.
In your WordPress dashboard, you can set up as many content rules as possible when you head over to the MemberPress >> Rules section. Let’s take a look at some below.
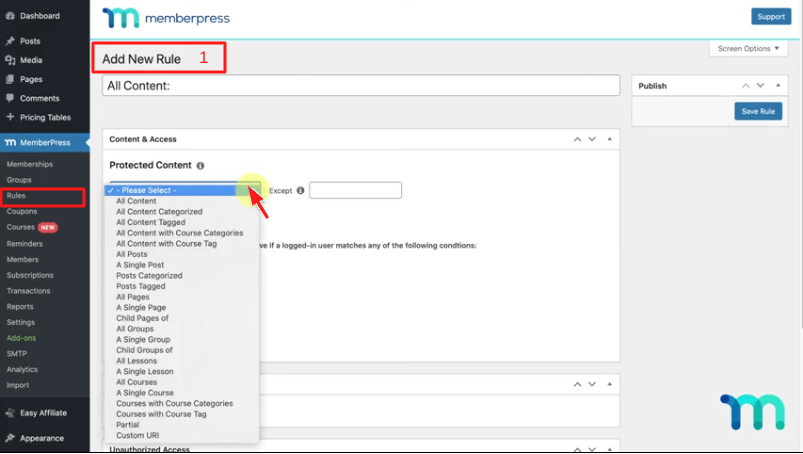
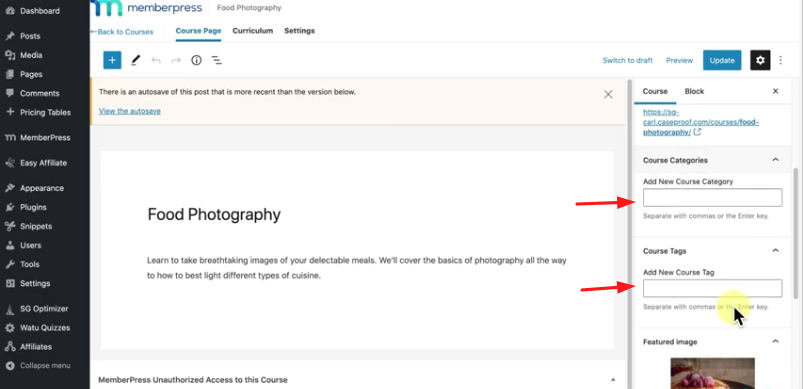
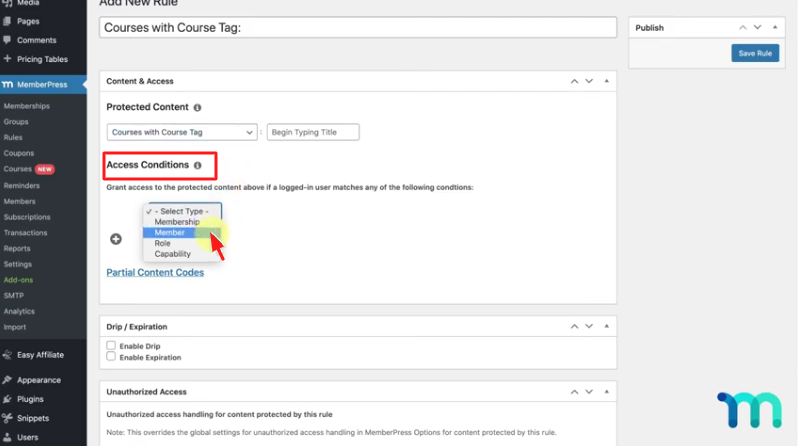
- Allow content with course categories and tags – This rule option helps you protect or restrict access to all your premium courses assigned under a specific category or tag.
- All group, Single group, Child group – This allows you to protect your courses from some set of membership groups on your site. It will restrict access to a particular group pricing page.
- All posts, Single post – This rule protects either all posts or a particular post, which you can specify by entering its title in the relevant field.
- All lessons, Single lesson – This can be used to protect lessons inside of a course in MemberPress courses.
- Custom URI – You can also protect a specific URL, which is particularly useful if you want to restrict access to downloadable digital items such as e-books or documents.
As a membership site owner, you can apply these rules to any part of your content posts or pages. You can as well edit any rules you have initially set up to suit your purpose or add new ones. Once done, click Save.
Also, note that if you are going to be using the All content rule, make sure you exclude all necessary pages such as the MemberPress account page and other important pages for easy access by new visitors and existing members.
How To Create Content Rules In MemberPress
Now that you have an idea of what content rules are and what they can do to your membership site, let’s see some content protection rules in MemberPress, and how to create a few of them right from your WordPress dashboard.
For example, you have set up MemberPress on your food photography website or blog. And you are about to start offering premium online courses to subscribers. You can either grant or restrict access to the courses by activating all or some of the content protection rules.
Setting up these content rules on your membership site lets you maximize your revenue by encouraging your members to upgrade their memberships to gain access to more content.
It’s also useful for making sure your course team or group of instructors can see your entire site, giving free access to certain people, and more. Let’s get started on creating some samples below for you to follow.
1. Content And Access Rules
First, you create content and access rules to protect all the types of content rules available in MemberPress.
Visit the MemberPress >> Rules >> Add New section on your WordPress dashboard. Then hover to the content and access section to choose All Courses.

The same thing also applies to course categories and course tags. You can protect all courses with specific categories or tags applied to them as well by editing the courses and selecting the categories you added.
2. Grant Access Conditions
Granting access to your protected content is easy as long as a logged-in user matches any of the following conditions. You can grant access per;
- Membership Level
- Individual member
- Site roles such as administrator, editor, and more
- Site capabilities such as being able to publish a post
Also, you can add more than one access condition by clicking the plus button under the section shown below.
Another example: You can select a single page from the protected content section, then select which of the pages you want to grant access to.
Under the membership level, you can choose a Gold membership and click the plus sign button to choose a member who doesn’t have a Gold membership but would like to be granted access to it. After that, you click the save button.
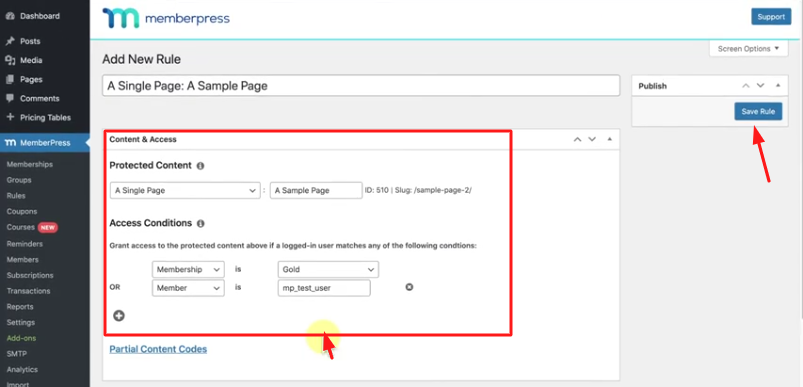
Activating this will enable the member to have access to the page regardless of whether he meets the criteria or not. Also, it will protect the page from non-gold memberships. Ensure you click the save button after setting up.
3. Partial Content Rules
Partial Rules are useful for protecting part of the content in a page or post. This can be achieved by using partial content codes. For example, you can protect either a paragraph, an image, a video, or a widget in a post or page while leaving the whole post or page available to everyone.
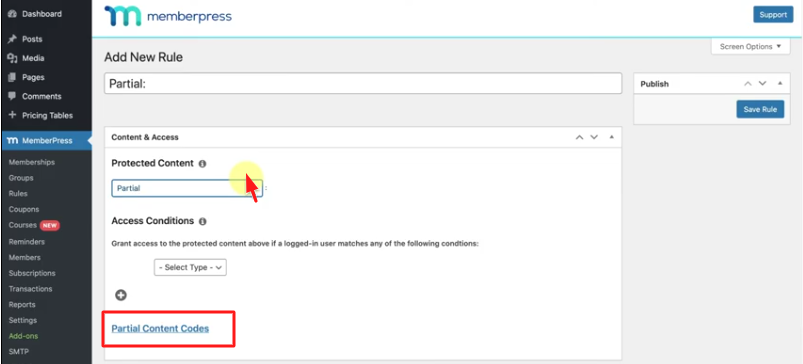
When generated, the partial content codes can be wrapped in content posts or pages to hide a specific chunk of content.
Any ordinary member who stumbles on such posts or pages can only read part of the content and see a prompt call to action button to subscribe before he or she continues reading.
The codes can be used on both protected and unprotected pages or posts. All you need to do is copy the shortcodes into any post or page section you want to protect. Make sure you set the membership level you want to restrict access to and then click the save button.
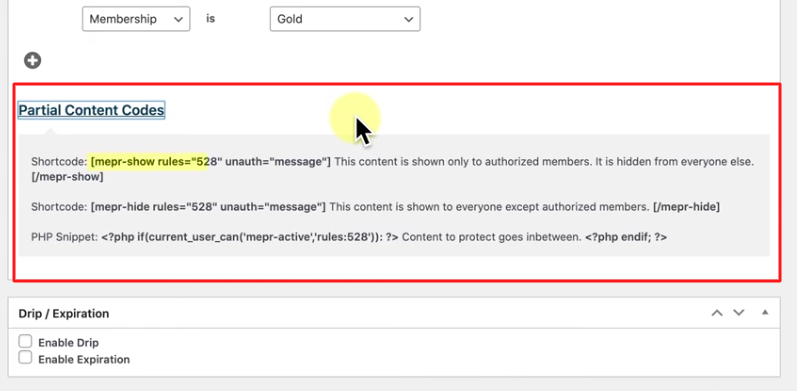
Here’s an example of what the shortcode looks like on a post with a title that says – 10 tips on how to start a successful business. And only your gold members will be able to see the entire post.
You can grant access to non-gold members to read only 5 tips on the post by inserting the code in between the posts. Doing so will prompt them to subscribe to your gold membership plan to unlock and read the remaining 5 tips. It’s as simple as that.

Golden Tip: To maximize revenue, always entice members with valuable content to make them subscribe to your membership plans.
4. Drip And Expiration Rules
The next section you’ll come across when creating rules to protect your content in MemberPress is the drip and expiration rule. This lets you tease your audience with new offers, or create limited-time deals, which can increase your membership site signups.
The Drip rule enables you to unlock certain posts or page content when an action such as new membership registration has taken place. Other actions can be a new membership level subscription or a particular date selected.
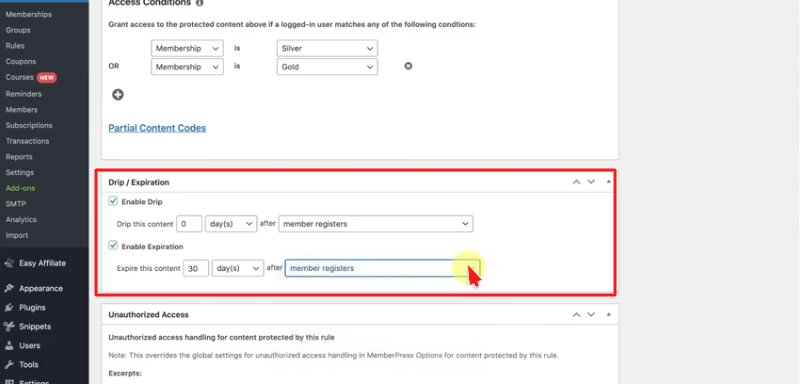
Additionally, you can also use the partial drip content rule to increase signups by letting unregistered users have access to only part of the content of your posts or pages.
The expiration rule lets you set the period of content available for your new subscribers. You can decide to set a particular time such as days, weeks, months, and so on.
For instance, you might want to offer access to a specific page for one month following registration. Once that period expires, your new subscribers won’t be able to have access to the content, and they will get a message to sign up for a paid membership subscription.
5. Unauthorized Access Rules
The unauthorized access rule lets you override default excerpts, unauthorized messages, and a login form with a customized message for any content rule you create. For example, when any non-gold subscriber tries to access any of your gold membership content, it redirects them to another instead of the default setup.
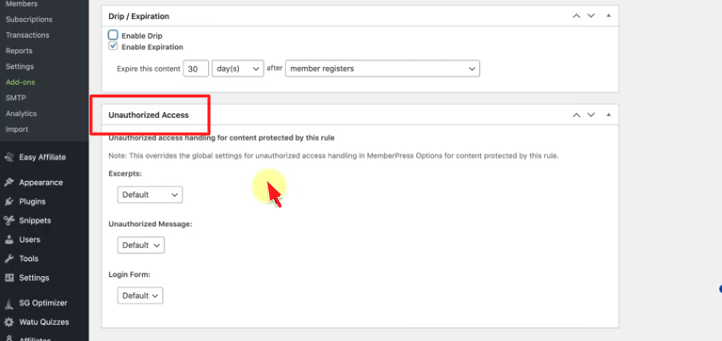
In the excerpts section, you can customize the amount of content displayed. You can also experiment with other subsections such as more tags, post excerpts, and customs. But I won’t recommend you choose the hide feature because it will affect your site rankings as your content will be hidden in search results.
The unauthorized message rule lets you customize the message that will be displayed anytime a non-gold member tries to visit your gold membership content. For instance, you can display a customized message like: Sorry you will require a gold membership plan to access this content.
Lastly, the login form rule lets you choose whether to hide or display a login form to a non-gold member who tries to access a gold membership content page.
When you choose the hide feature, the non-gold member won’t be able to see a login form. Instead, the member will see an unauthorized message prompt to subscribe to the gold membership plan before being granted complete access.
Conclusion
You’ve now seen how to create rules to protect your content in MemberPress and are now familiar with the many types of rules you have available to build your membership site.
If you have created your membership site with MemberPress and already started giving out free online courses, you can begin the next phase as you set up all the necessary rules to protect your content and start making money by offering premium online courses today.
Also, don’t forget to set up reminders to automate the emails sent to your subscribers.
Peradventure you are still contemplating whether to use MemberPress to create your membership site or not;
Popular membership sites use MemberPress to build their online course platforms because of its rich and easy-to-use features. You have a lot to gain with MemberPress. You too can become the next Udemy or Coursera and others in no time. Take action today!
PS: You can hire a website expert at TemydeeDigital to create a professional membership site with MemberPress for you.
Disclaimer: TemydeeDigital may be an affiliate for one or more products mentioned in this article. If you click a link and complete a purchase, we may earn a commission.