Do you want to take your ideas to the next level and stand out from the crowd with what you do best in today’s world? One of the most effective ways to do this is by starting a WordPress blog.
Can’t wait to get started?
The internet provides a platform for aspiring content creators like you to reach a global audience. Building a WordPress blog is a great way to build a career, a business, a lifestyle, and more. You can share your content with like-minded people and make money while doing it.
In this tutorial, I’m going to show you how to start a professional blog in just a few steps without writing a single line of code.
WordPress is my favorite blogging platform to create a blog on because it’s so easy to use.
Let’s get started!
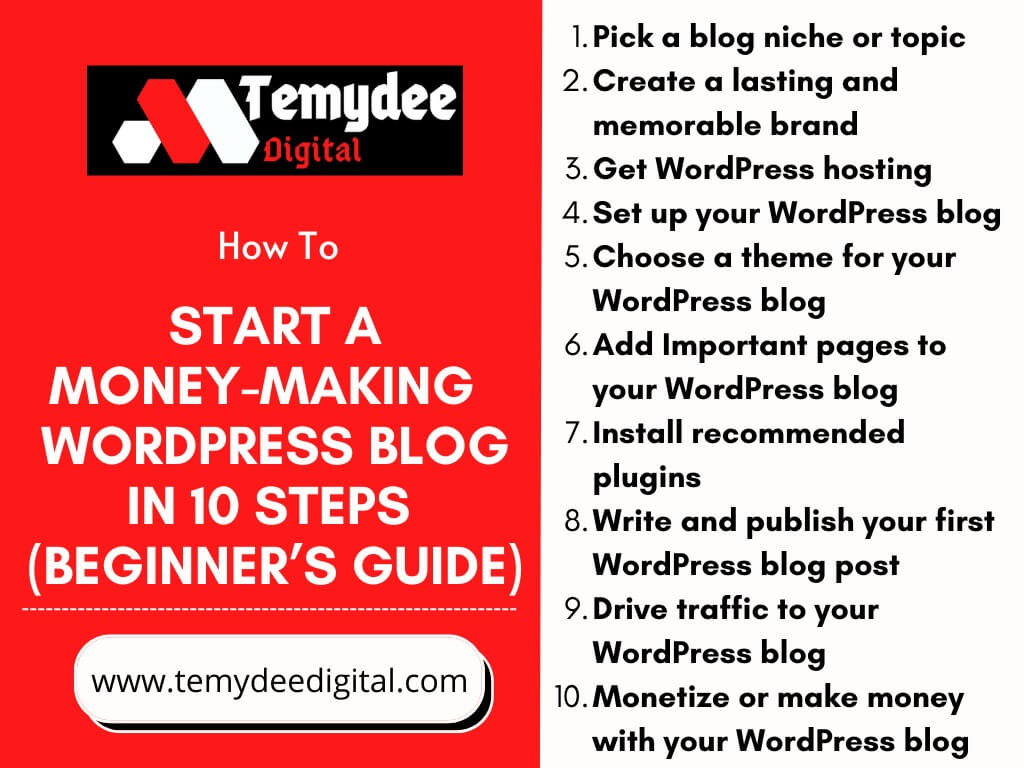
- Pick a blog niche or topic
- Create a lasting and memorable brand
- Get WordPress hosting
- Set up your WordPress blog
- Choose a theme for your WordPress blog
- Add Important pages to your WordPress blog
- Install recommended plugins
- Write and publish your first WordPress blog post
- Drive traffic to your WordPress blog
- Monetize or make money with your WordPress blog
Step 1. Pick a Niche or Topic For Your WordPress Blog
Before you embark on starting a WordPress blog, it’s imperative you start by asking yourself these questions:
- Why do I want to blog?
- What am I really good at?
- Where does my passion lie?
- How can I be of help to people with my talent or skills?
- What are people interested in?
- What do I intend to achieve from blogging?

It is essential to address these questions in order to avoid burnout in the early stages of the blogging journey. I have personally gone down this path and made mistakes. I cannot recount the amount of WordPress blogs I have started that ended in failure.
Do not succumb to this temptation. Your enthusiasm will provide you with the courage to persevere when things appear to be going in the wrong direction. Your enthusiasm will motivate you to acquire a related skill.
It is important to note that blogging is not for the faint-hearted or those seeking a ‘get rich quick’ route. To be successful in blogging, one must be prepared to put in a significant amount of effort.
Prior to embarking on a blogging journey, it is important to identify and define a specific niche or field of expertise.
Generally, content creators and bloggers tend to focus on a variety of topics, such as travel, food and fashion, health, and business, to name a few. However, each of these topics can be broad, so it is recommended to select one and dedicate a significant amount of time to it.
Before commencing a WordPress blog, it is advisable to ensure that the niche chosen aligns with one’s skills and interests. For instance, the WordPress blog that you are currently reading is focused on digital marketing, as the author enjoys aiding small businesses in their growth through the Internet.
Following this initial brainstorming exercise, the next step is to develop a memorable brand.
Step 2. Create A Lasting And Memorable Brand
In the world of blogging, you need to create a brand that stands out from the crowd. Choosing your WordPress blog name and domain name, developing a logo, creating a blog banner, creating a business email, creating letterhead paper, etc. all need to be well intact and presented.
This process usually takes several days, but it’s worth it. It’s best to get most, if not all, of this, done before your WordPress blog goes live. For example, you can start developing your logo using popular online media graphic tools like Adobe Express, and Canva, or you can spend a few extra bucks and hire a graphics designer on platforms like 99Designs, or Fiverr.
Once your WordPress blog goes live, ensure you maintain consistent colour link texts, catchy blog post banners, fonts, and so on.
Also, the best way to choose a domain name is to make sure it matches your niche or speciality. If you want to use your own name, that’s fine too.
The biggest thing to keep in mind when registering a domain is the length. Generally, one to two sentences are fine. Just make sure it’s not too long!
If you’re new to domain names, we’ve created two guides for beginners that you can check out later:
The next step is getting WordPress hosting, where you’ll have the privilege of getting a free domain (also for a year).
Step 3. Get WordPress Hosting For Your Blog
If you want to start a blog, you’ll need WordPress hosting. That’s where your content, like articles, photos, videos, and PDFs, will be saved and displayed to your readers whenever they visit your blog via Google Search, other search engines, or directly on their web browsers.
I’m going to tell you how you can get the best WordPress hosting at the most affordable price.
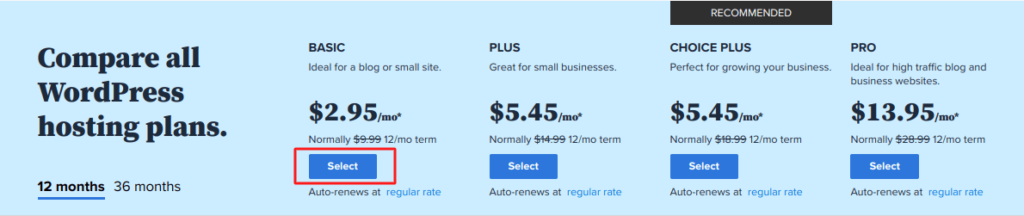
Head over to Bluehost and choose the WordPress basic WordPress hosting plan.
Bluehost is currently the largest WordPress hosting company in the world and powers millions of websites, blogs, and more. You’ll get a free domain with your hosting plan. The basic WordPress hosting plan is just 2.95/month (you’ll have to pay for the year, which is 35.40/month).
Now let’s see how to set up an account on Bluehost.
How To Set Up A WordPress Hosting Account For Your Blog on Bluehost
First, go to Bluehost and select the WordPress Basic plan from the list of hosting plans below. As you can see from the screenshot below, the WordPress Basic plan is perfect for you at this stage of your blogging journey.
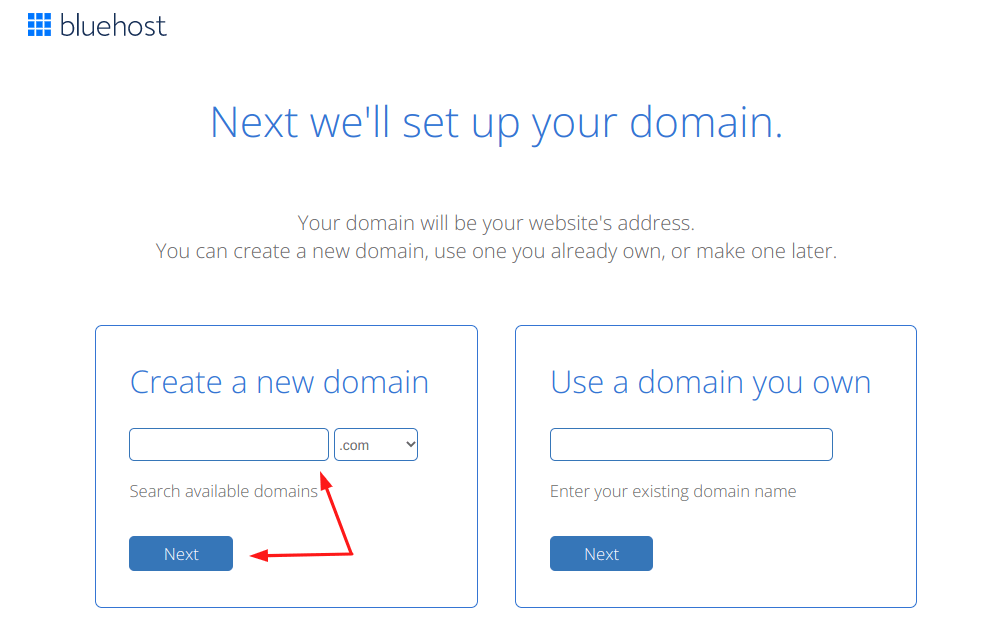
Next, it takes you to the point where you need to enter your blog domain name. As you can see from the screenshot below:
Enter your domain name to get your free year.
The next step is to input your account details to finish the payment process as shown in the below screenshot.
The 36-month plan is the most cost-effective option. It allows you to extend your first-year savings up to 3 years. You can also opt-in for a 12-month plan if you can afford it.
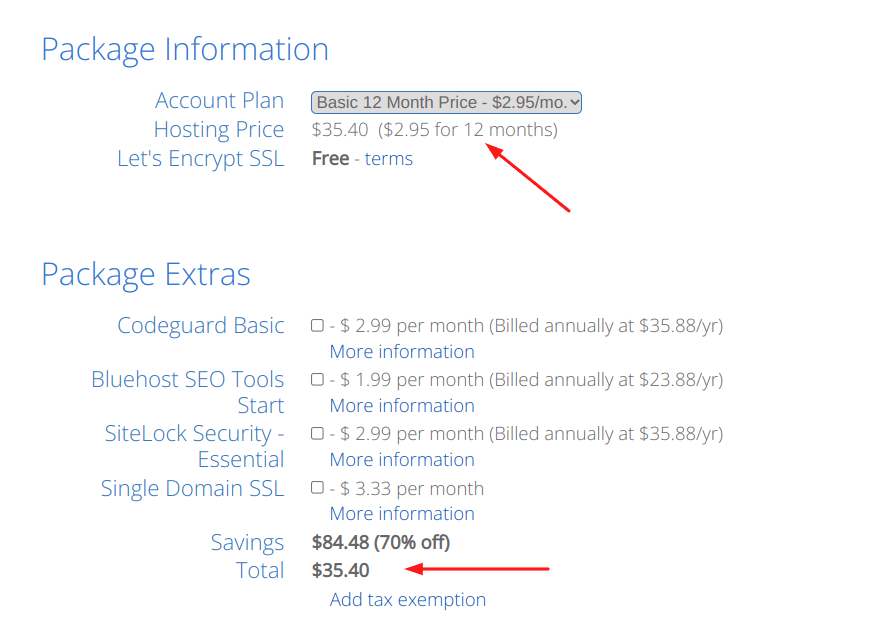
Uncheck the packaging extras because you won’t need them. Once you do that you will arrive at $35.40 to pay for 1 year.
Immediately you get past that, congratulations to you for owning a piece of the internet. It will take just a few minutes for Bluehost to finish creating an account for your WordPress blog. Now let’s move on to the main settings.
Step 4. Set up Your WordPress Blog
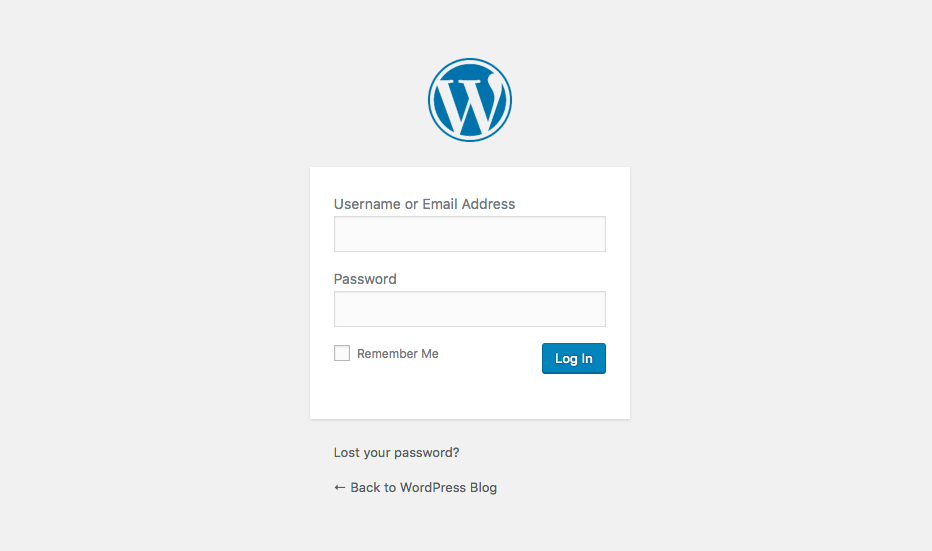
Setting up your WordPress blog is essential once you have finished creating an account with Bluehost. Bluehost will then send you an email containing your login URL alongside your password. Simply click the link to log in and first change your password.
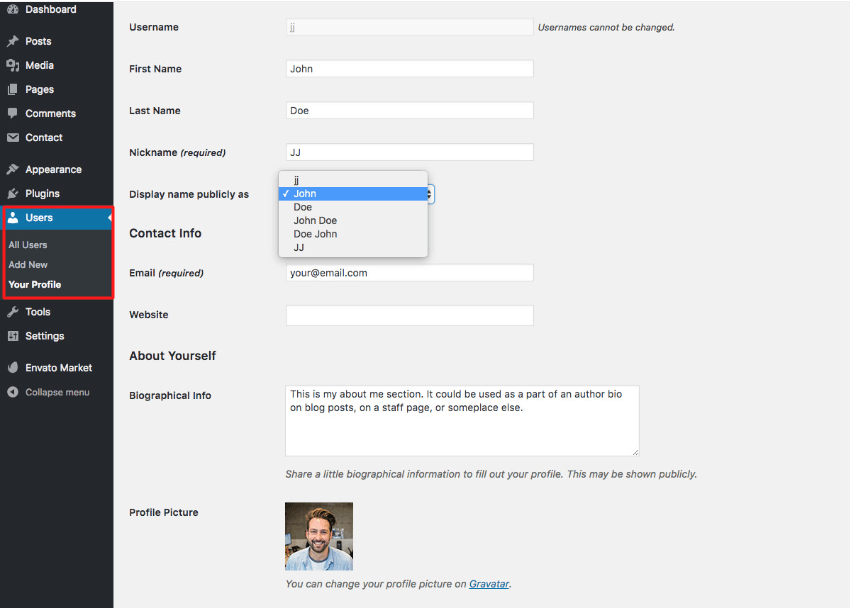
Now log in again to your dashboard and begin with your profile setup. This information is what usually appears on blog posts as the author. So, visit the Users section to create a username and your name (either a nickname or a real name ) you would like to display any time you publish a post.
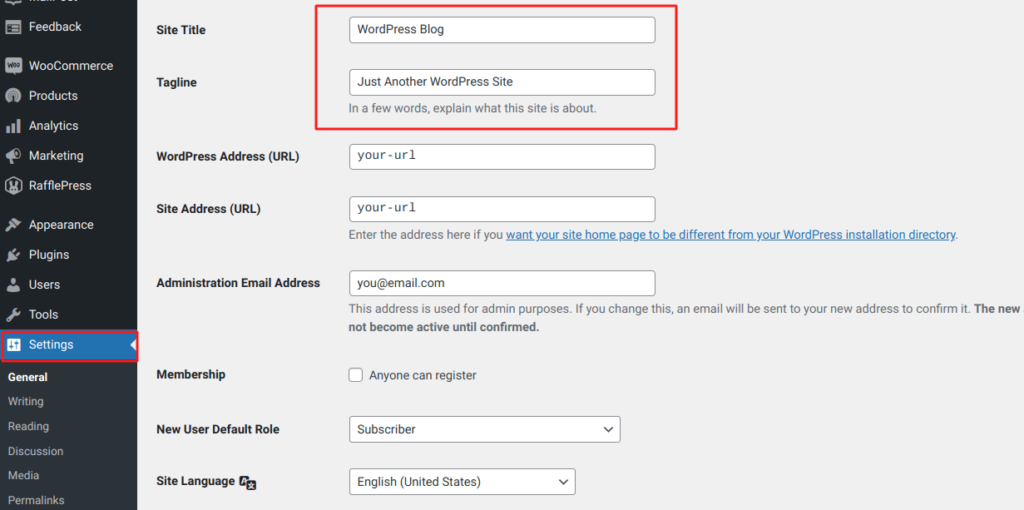
Next, visit the General WordPress settings. In this section, you will need to put in your Site Title and Tagline. Your site title will be your WordPress blog’s name, while your tagline will describe what your blog is all about.
You can also change the time and date format depending on your location. Remember to scroll down to click the Save Changes button.
Next, you will visit the writing settings to add your new tags and categories for your blog posts. Note that you can always come back to each of these settings to adjust them if you currently don’t know what to enter in some fields.
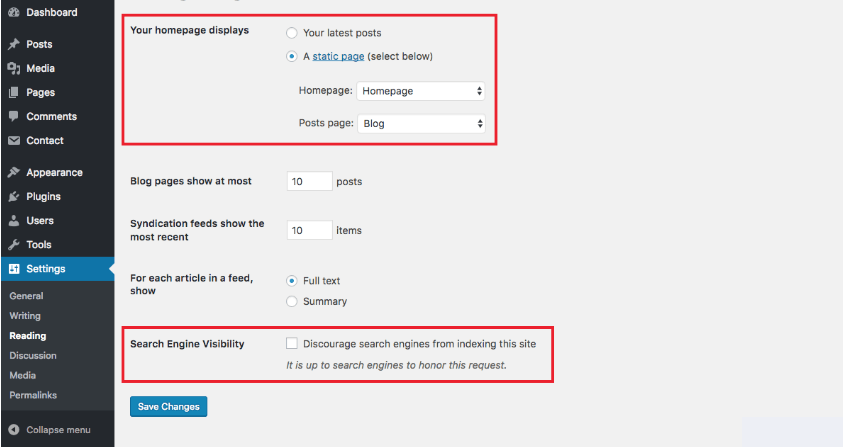
The Reading section is where you will display your Homepage and Blog. Some WordPress blogs don’t use to bother setting this. However, if you want to differentiate your latest posts from static pages, you will first have to create two separate pages and then come back to this section to insert them.
Also, ensure you uncheck the search engine visibility box before clicking the Save Changes button.
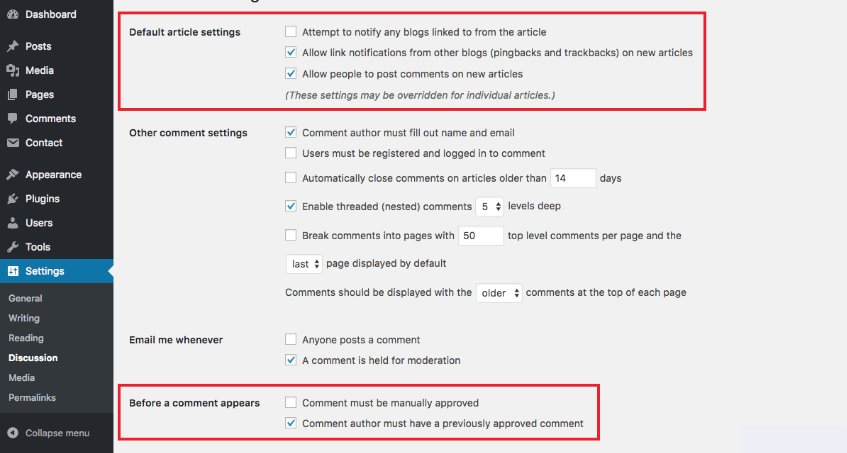
Click on the Discussion settings to moderate the comments that will be pouring in later once your WordPress blog goes live. I recommend manually approving comments to avoid spam in your comment box.
Lastly, visit the permalink settings to choose your preferred link. Permalinks are what appear in the browser address bar when a visitor lands on your site. A typical example is a permalink for this page is “start-a-wordpress-blog”.
Having SEO (Search Engine Optimisation) in mind, I usually recommend WordPress blog starters choose the Post name type.
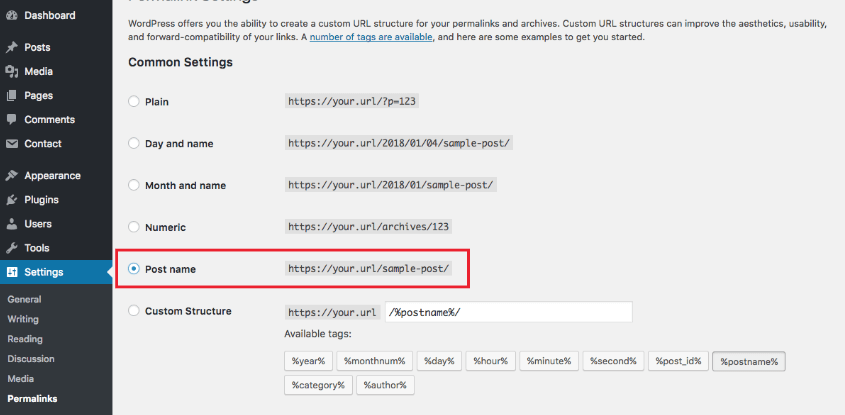
Note: Do not choose another permalink structure once you start to publish your posts. Because if you do, your posts will no longer be accessible on search engines and it will result in broken links and 404 errors on your WordPress blog.
Step 5. Choose A Theme To Start Your WordPress Blog
You need to wear your WordPress blog with a new theme just like you would normally pimp your old ride. Your site’s design lies on it.
By default, a free WordPress theme will be available for your blog, however, it is generally recommended that you choose the theme that best suits your needs.
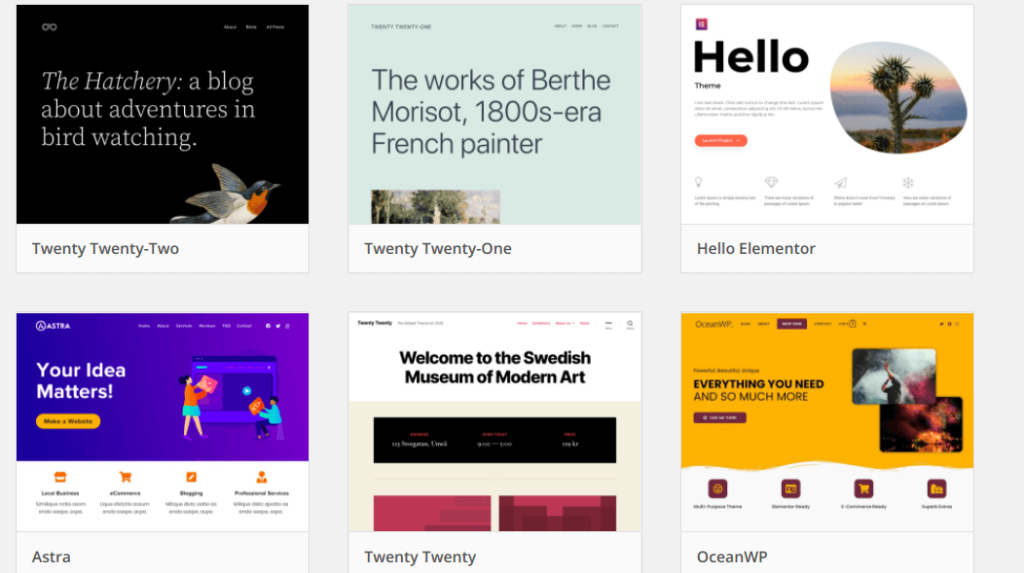
If you’re looking to add a new WordPress theme to your blog, there are plenty of free ones in the repository. I suggest you take your time and pick the one that’s right for you.
But don’t rush it – your content is the most important thing. If you want to get started, check out my top picks for free and premium WordPress themes.
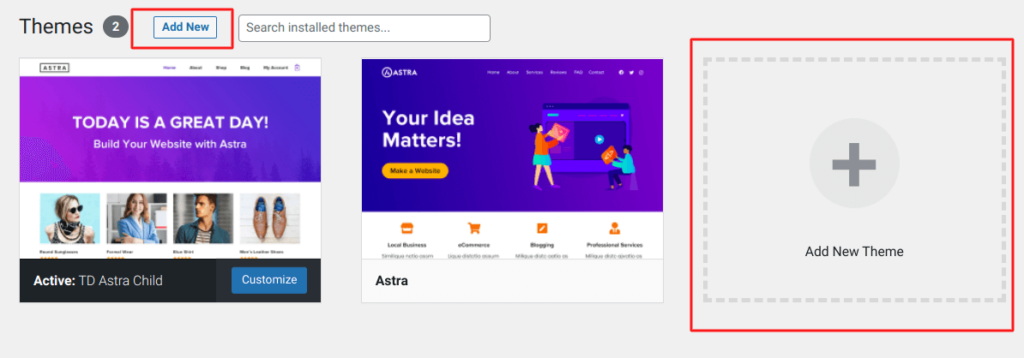
To add a new theme, go to your WordPress blog’s Appearance settings and click ‘Add New‘ or ‘Add New Theme‘ to get to the theme repository, like the screenshot below.
Note: When adding a new theme, ensure you don’t add along its pre-texts and images. Add your own texts and images instead.
Then, go ahead to adjust every other necessary setting from the ‘customize’ settings. Also, you can further customize your blog posts and pages with WordPress page builders.
Step 6. Add Important Pages To Your WordPress Blog
Before you start publishing your posts, there are a few important pages you need to create. These pages include:
- Privacy Policy
- Terms and Conditions
- Disclaimers
- Contact
- About us
- And so on.
To create one of these pages, go to the WordPress dashboard and click ‘All Pages’ and ‘Add New’. The page will open and you will need to enter your name and content. Then, click the ‘Publish’ button.
You can either save these pages as they are or come back and add the right stuff to each one before you post them.
Once you are done with creating the pages, you can then go on to add them to your Header and Footer menus for easy navigation for your readers. An example is our header menu screenshot below.

Another perfect example is that of Hubspot’s website below.

Hint: Visit other popular websites and blogs to get inspiration on how to set up your header and footer single and mega menus.
Step 7. Install Recommended WordPress Plugins
As a new WordPress blogger, you probably don’t need a lot of plugins to get up and running. But if you do, you might want to consider adding some plugins to your site to give it more features and make it more efficient.
Here’s a list of some of the best WordPress plugins you can add before you start publishing on your blog.
- Yoast SEO – This plugin helps you create visibility and boost your content on search engines and social media.
- Askimet Spam Protection – Helps you prevent comment spam on your WordPress blog.
- WP Code – This is an all-in-one plugin that helps you add essential scripts and custom codes to your blog.
Later you can install some other must-have plugins to achieve the best out of your WordPress blog.
To install a WordPress plugin, simply navigate to Plugins and Add New via your sidebar. Then search for the plugin from the search bar and click on ‘Install Now‘.
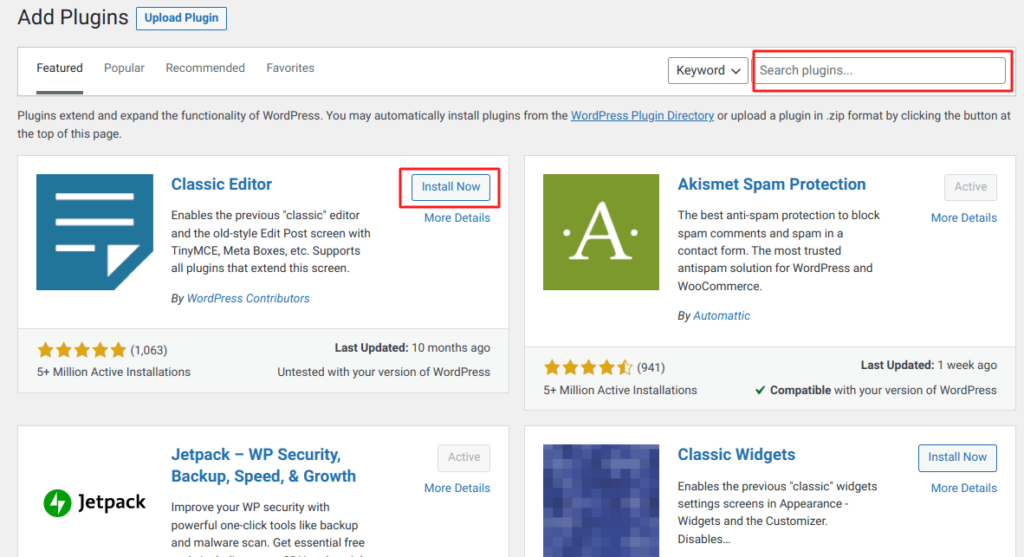
Repeat the same process to install more plugins. However, install the necessary plugins instead. And don’t add too much so as not to slow down your WordPress blog.
Step 8. Write And Publish Your First Blog Post
If you made it to this section, congratulations on being an action-oriented person. Before you go any further, don’t forget to follow us on WhatsApp Channel for some of the best growth advice and guides for WordPress blogs.
So, go ahead to write and publish your first post. I hope you’ve already figured out what you’re going to write about, as outlined in step 1.
To help you out further, think about how you easily communicate with your friends whenever you are among them. Use the same approach whenever you want to write about a topic. Keep it unique, adventurous and fun. Don’t plagiarize. And always make sure your grammar, spelling and punctuation are perfect.
Every new WordPress blog comes with a sample post (TODAY WORLD!) and a comment. Feel free to remove them and start fresh.
To write your first post, go to Posts. Click on ‘Add New’ on your sidebar to open a blank page.
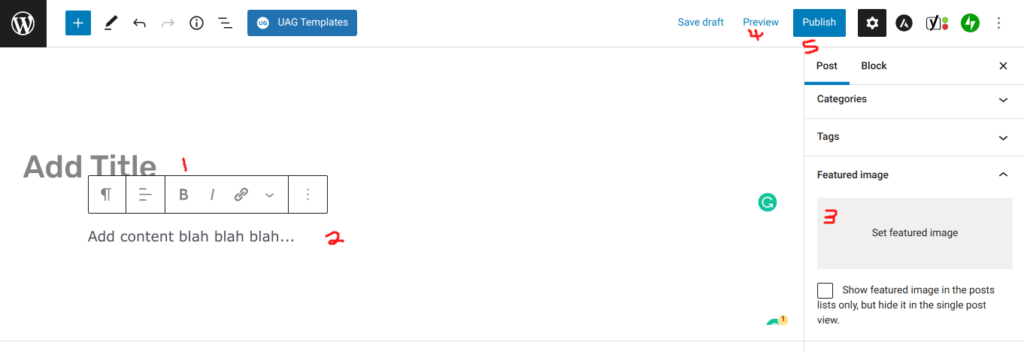
Enter the following information below to create your first post:
- Add your title and don’t let it be too long.
- Write your blog post (preferably between 1000 and 1500 words depending on the topic). GetGenie AI SEO writing tool makes this faster and easier.
- Choose a category or categories and tags (optional).
- Insert a featured image (usually 1200px length and 600px width).
- Preview your blog post to let you see what it will look like in the front end.
- Hit the publish button.
Step 9. Drive Organic Traffic To Your WordPress Blog To Grow Your Audience
Congrats again on launching your new WordPress blog. But this isn’t the end because you’ve only just begun your journey as a blogger. Your next step should be to start asking yourself questions such as “How do I get traffic” to your new WordPress blog or “How can I get more traffic to my site” etc.
Over the years, I’ve learned that getting organic traffic to your blog or promoting your WordPress blog isn’t a one-time thing. It takes consistent practice every day, week, or month. It all depends on the amount of time you’re willing to invest in growing your blog.
Mastering keywords plays a huge role in the area of content development which will enable your blog to generate a consistent amount of traffic and grow your audience.
Also, your blog attracts more web visitors and leads through the following continuous practices:
- Regular posting of valuable and optimized content for human readers and search engines.
- Continuous on-page SEO, off-page SEO, and technical SEO practices.
- Giving out freebies that come in the form of PDF downloads, and so on.
- Hosting occasional webinars to attract new leads.
- Improved user experience.
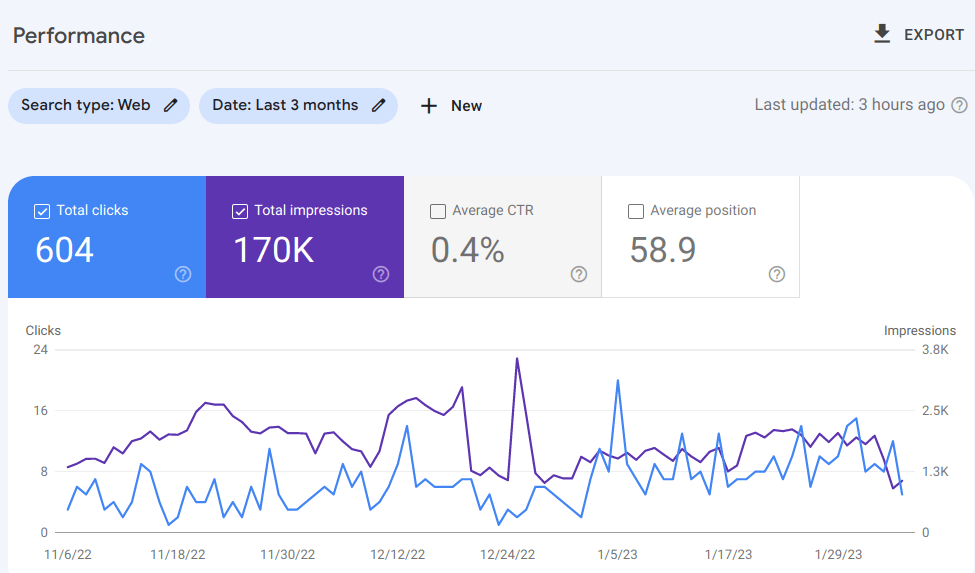
Once you have started publishing posts on your WordPress blog, make use of Google’s Keyword Planner to create effective search campaigns, get more keyword suggestions, personalized SEO suggestions, daily rank tracking, and much more.
Lastly, in this section, ensure you continually optimize, and monitor the performance of your WordPress blog in Google search results by setting up the following recommended tools:
- Google Search Console (GSC)
- Google Analytics
- Bing Webmaster Tools
- Connect GSC and Google Analytics in order to track helpful marketing data in your Google Analytics account.
Step 10. Make Money With Your WordPress Blog
A blog is infinitely pivotable, and scalable, and can serve as a foundational piece to build your brand and multiple passive income streams into your life. First, with a lot of input at the beginning, you can walk your way up the financial ladder for years to come.
WordPress beginners and intermediates can make money with their blogs using some of the ways which include:
- Freelancing: You can make money immediately by selling your expertise for hundreds and thousands of dollars a month.
- Affiliate Marketing: You can make money referring visitors (who are likely potential buyers) to some company products and/or services through your blog posts.
- Consulting: You can offer some counselling sessions to your audience looking for a solution to a particular problem.
- eCommerce: You can sell physical products on your WordPress blog by creating an online shop.
And so much more. You can look up some other money-making ideas in this guide.
FAQs on How To Start A WordPress Blog
Get Started With Your Own WordPress Blog Today!
WordPress is a flexible and easy-to-use, free-to-use blogging platform. With WordPress, you would be able to network with other WordPress bloggers in your niche and make money while doing it.
If you have any questions or have any difficulties starting your WordPress blog, please feel free to leave a comment. I would be happy to assist you.
Finally, if you don’t have time to create your own WordPress blog, don’t worry, we offer a free basic WordPress Blog setup.
We hope this article helped you easily start a WordPress blog. You may also want to see our detailed guide on how to create a WordPress website (step by step).
Kindly subscribe to our email newsletter below for more tutorials. You can also join our communities on Twitter, LinkedIn, and Facebook.
Disclosure: We get commissions for purchases made through referral links in this post.